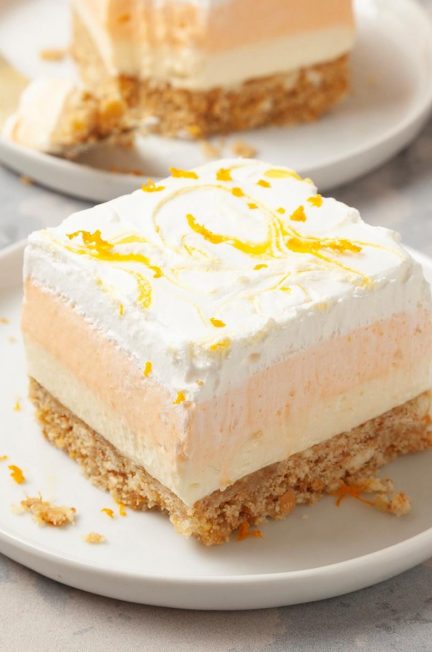
Everyone has a favorite treat from the neighborhood ice cream truck, whether it’s a frosty snow cone or a strawberry shortcake bar. One of my all-time favorites is the creamsicle, so I wanted to capture the beloved orange-vanilla flavor in a format that I can make more easily at home—hence, these orange creamsicle bars! With this no-bake dessert recipe, no sticks are necessary: Instead, tidy squares show off lovely white and orange layers.
Classic orange creamsicles are vanilla ice cream pops coated with a thin layer of orange sherbet. They have a creamy texture with soft vanilla and orange flavors. Our orange creamsicle dream bars recipe re-creates that flavor with a cream cheese and Cool Whip filling blended with vanilla and orange juice. It’s a cool summery dessert and ice cream truck copycat recipe that’s pretty enough for parties, and like many of our no-bake dessert bars, it’s easy enough to make for an after-dinner treat.
Orange Creamsicle Bar Ingredients
- Vanilla wafer cookies: The crushed cookies make a simple vanilla-flavored base for the bars. It’s one of several tasty vanilla wafer cookie recipes that make it worth keeping a box on hand.
- Cream cheese: Many no-bake, creamy desserts begin with cream cheese. To ensure a smooth mixture in this recipe and other cream cheese desserts, soften the cream cheese thoroughly before beginning.
- Orange juice concentrate: Because frozen orange juice concentrate has much of the water removed, a small amount packs a lot of orange flavor.
- Confectioners’ sugar: This fine sugar blends smoothly into the cream cheese mixture to sweeten the filling.
- Butter: Melt unsalted butter and blend it with the cookie crumbs to make an easy no-bake crust.
- Frozen whipped topping: Let it thaw in the fridge before blending it into the filling. As with other Cool Whip recipes, the topping adds sweetness and a creamy texture.
- Vanilla extract: Pure vanilla extract, along with the orange juice, gives the bars that wonderful creamsicle flavor.
- Orange gelatin powder: Use this ingredient to create the orange-colored layer in the center of the bars. The powder adds a little more orange flavor too.
- Salt: Add just a pinch of salt to make the filling flavors really pop.
Directions
Step 1: Prepare the pan
Line an 8×8-inch baking dish with parchment or waxed paper by cutting two long pieces and crisscrossing them so that they extend over the edges. This creates handles to lift the dessert after chilling.
Step 2: Make the crust

Combine the crushed vanilla wafer crumbs with the melted butter, and press the mixture into the bottom of the lined baking dish to make an even, firm crust. Place the pan in the freezer while you prepare the filling.
Editor’s Tip: While you can easily crush the cookies with a rolling pin in a large resealable plastic bag, you can also add the cookies to the bowl of a food processor and grind them into fine crumbs. Pour melted butter into the processor as it’s running to blend it with the cookie crumbs.
Step 3: Make the filling

Put the softened cream cheese into a large bowl and beat until it’s smooth and light, two to three minutes. Scrape the sides of the bowl as needed. Add the confectioners’ sugar, thawed orange juice concentrate, vanilla extract and salt.
Beat the ingredients together for two to three minutes, scraping the bowl once or twice. Finally, fold in 1-1/2 cups of the thawed whipped topping until well-incorporated.
Step 4: Make the layers

Spoon half of the filling over the cookie crust, pushing it into the corners and smoothing the top. Add the orange gelatin powder to the rest of the filling in the bowl, then beat the mixture at medium speed until the powder is blended in, the filling is orange in color and the mixture is slightly thickened, one to two minutes.

Spoon this over the filling in the baking dish, smoothing it to an even layer.

Finally, spread the remaining whipped topping over the top of the filling.
Step 5: Chill, then serve
Cover the dish with storage wrap and refrigerate the dessert for at least four hours or overnight so that it can set. Once it’s chilled, use the parchment handles to lift the dessert out of the baking dish and onto a cutting board. Use a sharp kitchen knife to slice the dessert into nine bars, wiping the knife clean between cuts to keep the bars tidy. Top each bar with an optional fresh orange slice, orange zest or orange fruit slice candy. Serve the orange creamsicle bars immediately.
Editor’s Tip: You could also add a few drops of thawed orange juice concentrate on top of the Cool Whip layer and swirl a thread of orange color on top of the bars before slicing into them.

Orange Creamsicle Bar Variations
- Try a graham crust: Instead of making this as a recipe with a cookie crust, make a crust from scratch with graham crackers. Our easy graham cracker crust recipe shows how to do it.
- Experiment with other types of crumb crusts: Don’t be afraid to experiment with other ingredients you can turn into a crumb crust. A nutty pecan or almond crust could work nicely in this context, as could a shortbread crust.
- Add orange zest: For extra orange flavor and flecks of color, fold orange zest into the orange filling layer.
How to Store Orange Creamsicle Bars
Because the orange creamsicle dream bars are made with dairy products, they should be refrigerated to make them last. Transfer the bars to a platter and cover them with storage wrap, or move them into resealable containers. Keep them chilled in the fridge.
How long do orange creamsicle bars last?
Your orange creamsicle bars will last for up to five days when they’re kept tightly covered and stored in the fridge to protect the quality and flavor.
Can you freeze orange creamsicle bars?
Yes, these bars can be frozen so you can have a dessert stashed away for a future treat. Transfer the orange creamsicle bars into a freezer-proof container and cover it tightly. Store the bars in the freezer for up to two months. To thaw them, move the bars to the fridge to defrost for several hours or overnight.
Can you make orange creamsicle bars ahead of time?
Yes, this orange creamsicle dream bars recipe is a great one to make in advance to save time on the day you want to serve them. After adding all the filling layers to the crust, the dessert can be covered and held in the fridge up to three days ahead of time. Then slice and garnish the bars just before serving. Another option is to slice the bars the day before you want to serve them. Arrange them on a serving platter, cover it with food wrap and hold it in the fridge. Add the optional garnishes just before serving.
Orange Creamsicle Bar Tips

How do you get a clean slice of orange creamsicle bars?
Orange creamsicle bars are prettiest when you can clearly see the orange and white stripes inside. To get clean slices, first let the bars chill thoroughly so they’ll set and be easier to cut. Use a long, sharp chef’s knife (a must-have kitchen knife) and press the blade straight down into the dessert. Press firmly when you get to the cookie crust. It’s also important to wipe the knife clean after each cut so that the slices stay clean and tidy. Use a small spatula to carefully move the bars apart.
How do you keep orange creamsicle bars from getting soggy?
One step in the orange creamsicle bars recipe that keeps the bars from getting soggy is chilling the crust in the freezer. The butter in the crust quickly firms up to prevent the filling from soaking in. After adding the filling, it’s also important to get the pan into the fridge right away so the dessert can chill and set. The concentrated orange juice adds orange flavor without adding too much liquid that would keep the filling from setting. Orange zest is a way to add more orange flavor, if so desired, without making the filling too liquidy.